Setting up your Substack
A short checklist of things to do to get your Substack ready for your launch


So you’ve selected your subdomain and set up your Substack. Congratulations! If you want, you can go ahead and send out your first post right now.
But if you’d like to spruce things up a bit more before you unveil it to the world, there are a few extra steps you can take that will give your publication some professional polish to really make it shine.
And if you want to earn money from your writing, the instructions below will help you turn on paid subscriptions, and invite your most dedicated readers to support your work, from your very first post.

1) Customize your About page
Your About page should be a description of the publication and include details on what people will get for free, plus what additionally they'll get if they pay for it. From your Substack homepage, just click on “About” in the top navigation bar, then “Edit”:

A few examples of awesome About pages to serve as inspiration:
Steady by Dan Rather: About page
Popular Information by Judd Legum: About page
The Audacity by Roxane Gay: About page
Thinking About by Timothy Snyder: About page
Persuasion by Yascha Mounk: About page
Ironsides Macro by Barry Knapp: About page

2) Upload a logo and cover page image
To create a distinctive visual brand for your Substack, we recommend uploading a logo and cover page image. Instructions on how to do this:
Creating a visual identity for your Substack

3) Turn on paid subscriptions
If you want your Substack to generate subscription income for you, our data shows it’s optimal to have paid subscriptions turned on when you launch. This gets the message across to your readers that this is a serious project for you, not just a hobby.
A strategy that’s worked extremely well for many writers is to have paid subscriptions turned on when they launch, but to publish everything for free for the first while, so readers can get familiar with what you plan to do on your Substack.
(After you turn on paid, with each post you publish, you’ll have the option whether you want it to go to “Everybody”, or only “Paid”.)
For example, when he launched his Substack, political journalist Paul Wells wrote:
For now, and for an initial period whose length I’m still figuring out, everything I post here will be available for free, so you can get a sense of what I’m up to. Even after I go behind a subscription paywall, some of the content here will always be free.
But I will be encouraging everyone who is able to become a paid subscriber. This is not my hobby. It’s my new job. The more of you who contribute to its success, the more ambitious I can be. I want to post audio and video content and host live events, online and in person. I want to travel to where news is happening. I’d like to do as much here as I could working somewhere else. Ideally more. You can contribute directly to making that possible.
How to turn on paid subscriptions: from your publication homepage, click on the Dashboard button in the top right-hand corner, then click Settings in the top navigation bar.
Scroll down to the Payments section of the page, and click the blue “Connect with Stripe” button. Have your banking information handy when you do this.
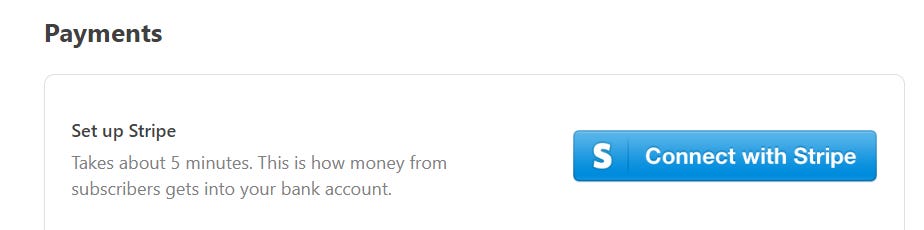
This process only takes about five minutes. When you finish entering your banking information, you’ll be kicked back to the Substack homepage, and invited to type in what you want to charge for your Annual, Monthly, and (optional) Founding plans.

4) Import your email list
If you have an existing email list, here's how to import it using our easy self-serve process: How to import your mailing list

5) Draft your launch post
Your launch post is simply your first-ever post on your new Substack. If you upload an existing list to Substack, it’s the first email you ever send out to your list from Substack, and it will also post on your publication page. If you don’t have any email list, it will still post on your publication page.
To draft your first post, click the Dashboard button, then and click New Post to draft it. It’ll automatically save under “Drafts”. Not sure where to go? This video walks you through drafting your first post: How to make a post on Substack
Your launch post is a space to let readers know what you plan to do with your publication, why it’s important to you, and what they’ll get for supporting it. A few examples of terrific launch posts, to inspire you:
Game File by Stephen Totilo launch post: Here we go…
After Babel by Jonathan Haidt launch post: Welcome to the After Babel Substack
Hung Up by Hunter Harris launch post: Some personal news: Okay, hi!
Thinking in Bets by Annie Duke launch post: Welcome to the Thinking in Bets Substack
Steady by Dan Rather launch post: A New Chapter...
A Year of Mental Health by Chris Guillebeau: INTRODUCING: A Year of Mental Health
Too Deep Zone by Mike Tanier: Welcome to the Too Deep Zone
Zeteo by Mehdi Hasan launch post: A New Media Company is Here - and Ready to Make Some Noise

6) Launch your Substack by publishing your launch post
Once you’ve completed the above elements, you’re ready to launch! Simply go to your launch post, and hit the “Publish” button in the top right-hand corner of the screen. Make sure you send your launch post to “Everybody”:

Right after you post it, you’ll see sharing features inviting you to share it to social media, and forward it by email to friends, family, and contacts. Sharing your post gets the growth flywheel turning and will let you start to build your email list, so your writing can reach an ever-expanding audience.
Congratulations on your Substack launch, and on taking the exciting first step in your independent publishing journey!

Getting started is easy
Haven’t launched your Substack yet? You can get started for free, and publish for free for as long as you want. The first step is to set up your Substack publication so you can grab your desired domain name. This takes less than a minute:
Want to learn more, or have a question not answered here? Check out our Frequently Asked Questions.
I found this helpful. Any revisions you’d recommend now that it’s been a year? Thanks!
I receive every week this messge:
"2 days left to hit your publishing goal.
You set a goal to publish on Substack every week. There are 2 days left this week, so here's a friendly reminder to get started — consistent writing is the secret to growth."
ok, but how can I change the day set for publication?
For example, no longer Sunday but Monday.